 Add Row
  Add
Add 


Did you know? Nearly 81% of homeowners believe that owning the right DIY home improvement tools reduces project time and cost dramatically. Whether you’re tackling your first home renovation or revamping your tool kit for a fresh improvement project, selecting the right essential tools can be the difference between a frustrating chore and a rewarding, cost-effective transformation. Let's explore which tools truly make your home improvement journey easier, safer, and a lot more fun.
Startling Stats: Why DIY Home Improvement Tools Are Transforming Projects
Home renovation is no longer just for professionals. With advancements in technology and accessibility, diy home improvement tools are empowering more homeowners than ever to take on ambitious improvement projects. The impact? More than just fresh paint and stylish décor—having the essential tools at your disposal radically increases your success rate, reduces errors, and saves both time and money. Studies show that well-equipped DIYers report far greater satisfaction and fewer failed projects than those without a reliable tool kit. For anyone beginning a home improvement project, investing in the right tools is no longer optional—it's essential for long-term value and enjoyable results.
Revealing the Impact of Essential Tools on Home Renovation Success
Imagine starting a DIY project only to halt progress because your power drill battery can't hold a charge or your screwdriver set is missing the exact size you need. That frustration is all too common, but completely avoidable. Armed with basic tool kits and upgraded power tools, homeowners say they feel more confident trying new projects, even those that once seemed intimidating. With the right mix of essential tools—like a trustworthy tape measure, versatile utility knife, or heavy-duty extension cord—you can transform complex renovations into smooth, streamlined operations. As one survey respondent put it, “Every time I tackle a new project, I realize just how crucial it is to have the right tool within arm’s reach.”
"Nearly 81% of homeowners believe that owning the right DIY home improvement tools reduces project time and cost dramatically."
What You'll Learn: The Essential Tools for Every Home Improvement Project
- Understand which diy home improvement tools are must-haves for any improvement project.
- How to select tools that match your diy project ambitions and skill level.
- Expert insights on tool usage and maintenance to maximize results and safety.
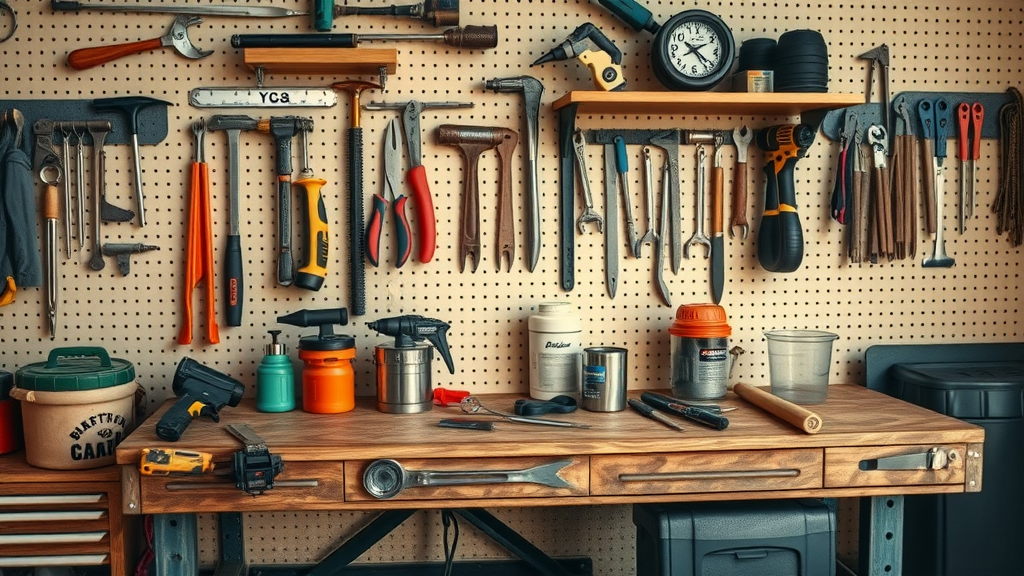
Table: Quick Reference of Essential DIY Home Improvement Tools
| Tool Name | Primary Use | Best For | Must-Have For | Power Source |
|---|---|---|---|---|
| Drill | Drilling & driving screws | All home projects | Most renovation tasks | Electric/Battery |
| Tape Measure | Accurate measurement | Layout & material sizing | Every improvement project | Manual |
| Utility Knife | Cutting & scoring | Drywall, cardboard, trims | Quick fixes & detailed work | Manual |
| Extension Cord | Powering tools | Flexible workspace setup | Projects using power tools | Electric |
| Screwdriver Set | Screwing & unscrewing | Assembly/disassembly | All project types | Manual/Electric |
| Claw Hammer | Nailing & demolition | Framing, removals | Construction & repairs | Manual |
| Driver Set | Specialty fasteners | Electronics, appliances | Detailed work | Manual |
| Wrecking Bar | Prying & demolition | Major renovations | Heavy-duty removal | Manual |
| Safety Glasses | Eye protection | Building & cutting | All projects | Manual |
1. Tape Measure: The Indispensable Essential Tool
No diy home improvement tools collection is complete without a reliable tape measure. This basic tool is the backbone of measuring materials for accurate cuts and secure installations in any improvement project. Quality tape measures offer clear markings, locking mechanisms, and a sturdy, retractable blade for ease of use. Whether you’re hanging a picture frame, planning the layout for furniture, or marking studs for a home renovation, precision is crucial. A trusted tape measure reduces errors, prevents wasted materials, and saves time, delivering long-term value across multiple home projects. Choosing a durable tape measure from respected brands means your measurements stay consistent, and you’ll avoid the headaches of stretched or worn-out tapes.
Why a Quality Tape Measure Matters for Every Improvement Project
The right tape measure supports both metric and imperial measurements, allowing versatility across international plans or instructions. Advanced models offer digital readouts—some even sync to phone apps for project logging. Top brands like Stanley, Milwaukee, and Komelon are favored for their durability and innovative features in every tool kit. When it comes to maintenance, always retract the tape slowly, clean debris after use, and check that the tip remains securely in place for accurate readings. Remember, an investment in a high-quality tape measure pays dividends in every home improvement project, providing you with reliable measurements that make every cut and fit easier and more secure.
- Metric vs imperial functionality
- Best apps and brands for home improvement
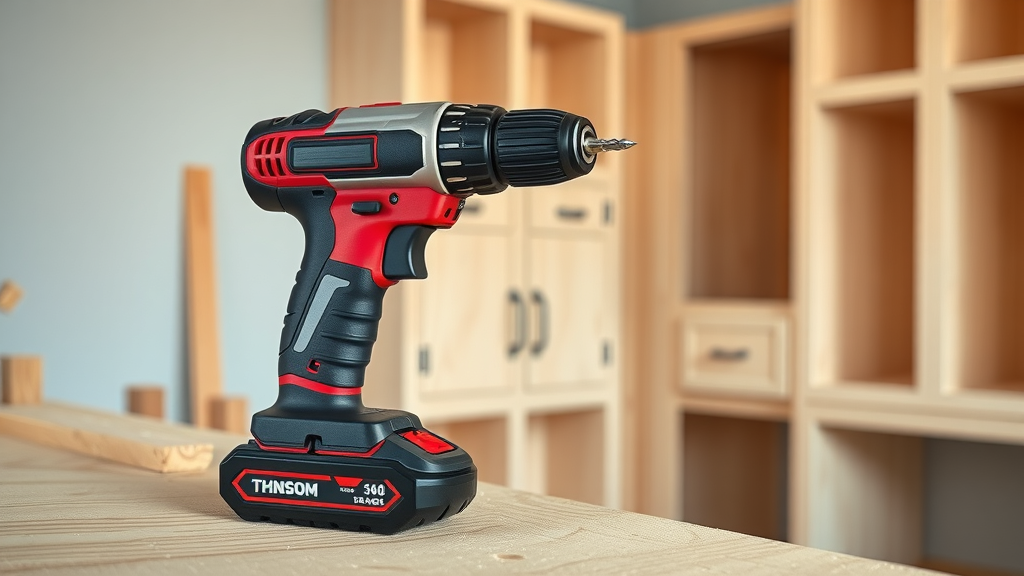
2. Power Drill & Drill Bits: Ultimate Power Tool for DIY Projects
If you’re serious about any diy project, a power drill is non-negotiable. This versatile power tool quickly becomes your go-to for drilling holes, driving screws, and even mixing paint or mortar (with proper drill bits and attachments). Cordless drills offer portability and convenience, letting you work anywhere without searching for outlets. Selecting the right drill means considering battery life, torque, speed settings, and compatibility with a wide assortment of drill bits. Brands such as DeWalt, Makita, and Bosch have consistently led the market in reliability and performance, making them staples of every tool kit. The drill’s importance is magnified in jobs like hanging shelves, mounting cabinets, or assembling furniture, where precision and power must work hand-in-hand.
How a Power Drill Simplifies Complex Home Renovation Tasks
Cordless drills eliminate extension cord hassles and simplify setup for quick fixes and large-scale renovations alike. Choosing the correct wattage (12-20V for most home projects) and a comprehensive bit assortment empowers you to tackle wood, metal, or masonry. Modern drills come with magnetic bit holders and LED lights for visibility in tight spaces. For safety, always wear safety glasses, ensure the drill’s clutch is set correctly for materials, and switch off before changing bits. A well-selected power drill, paired with the right driver set, speeds up even the most tedious improvement projects and is the favorite among many DIYers for its sheer flexibility.
- Key types: Cordless drill, bit assortment, safety
- Choosing the right wattage and attachments
3. Screwdriver Set & Driver Set: Basic Tools That Make a Difference
The next step in any diy home improvement tools collection is a comprehensive screwdriver set and a few specialty driver sets. A solid screwdriver set includes multiple sizes of both Phillips and flathead, as well as Torx and precision heads for small electronics or appliances. Choose magnetic tips for ease of use, and comfortable, ergonomic handles to keep your hands fresh during a long day of projects. Adding a power driver or interchangeable driver set brings efficiency, especially for assembling large flat-pack furniture or multiple cabinetry installations. With these basic tools in your arsenal, you’ll minimize stripping screws, secure fasteners tightly, and tackle more complex home renovation tasks with confidence.
Exploring Versatile Screwdrivers for Every Home Improvement Project
Versatility is the screwdriver set’s greatest attribute, and it’s worth investing in brands known for durability, like Klein Tools or Wiha. Specialty driver sets may also include socket adapters, hex shanks, or insulated options for electrical work. The main goal is to have the right tool for every fastener you encounter, preventing project delays or damaging valuable surfaces. If you work with older homes or appliances, make sure your set has vintage or specialty tips, as they are often irreplaceable for those repairs. Ultimately, a diverse screwdriver set pays for itself, streamlining repetitive tasks and letting you handle everything from basic assembly to detailed improvements—all safely and efficiently.
- Flathead, Phillips, and specialty drivers
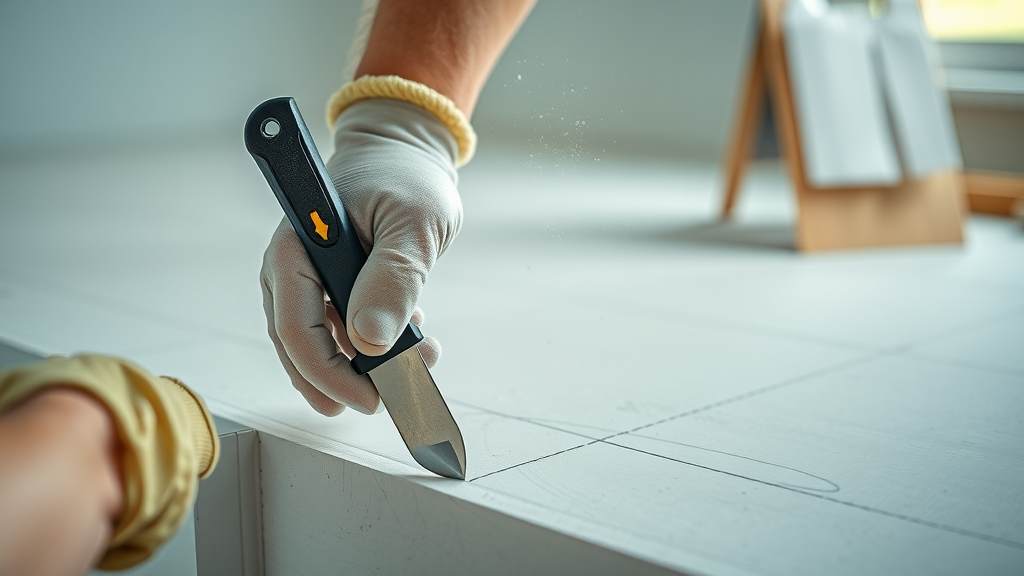
4. Utility Knife: Cutting Edge Among Essential Tools
When it comes to sharp, accurate cuts in drywall, carpet, or packing materials, a utility knife stands out as a true essential tool. This small but mighty tool adapts to nearly every home improvement scenario, whether you’re opening boxes of tiles or scoring sheetrock for a custom fit. The retractable blade design keeps you safe between uses, while snap-off blade models extend the useful life of every knife. Go for heavy-duty handles and blades by reputable brands to ensure safety and reduce the chances of injury during a busy renovation. Keeping the utility knife sharp is critical; a dull blade can damage materials or slip, so always replace or break off segments as they wear.
Applications and Safety Tips for DIY Home Improvement Tools
Use your utility knife for precision trimming, light demolition (like removing caulking), or refinishing edges before painting. Wearing gloves and using a steady, measured grip can help you avoid slips and accidents, especially when working with slick or dense materials. Dispose of used blades properly in a dedicated container. For advanced applications, consider knives with adjustable blade lengths and safety lock mechanisms. In any improvement project, respecting the utility knife’s sharpness and maintaining it correctly will ensure clean lines, fast progress, and a safer workspace every time.
5. Extension Cord: Power Tools' Unsung Hero
It’s no exaggeration—without a reliable extension cord, your most important power tools may become almost useless beyond immediate outlets. For larger home renovation spaces or outdoor work, a heavy-duty, properly rated extension cord bridges the gap, ensuring continuous power delivery safely. Look for cords with high visibility (bright orange or yellow), ground fault circuit interrupters, and ratings suited for your tools’ amperage. Always avoid daisy-chaining cords or using damaged cables, as these can pose fire and shock risks. The right extension cord won’t just power your tools; it safeguards your investment and your home against electrical mishaps during any improvement project.
Maximizing Reach and Power During Home Renovation
When choosing an extension cord, consider both length (typically 25 to 100 feet) and gauge (thicker is better for high-powered tools). Look for reinforced connectors and weatherproof insulation for outdoor or garage use. Regularly inspect cords for nicks, cuts, or exposed wire, and always coil and store them properly between projects to prevent tangling or cracking. Having several lengths in your tool kit ensures you can work efficiently in any environment, whether indoors, outdoors, or on multiple floors of the home. Smart, safe use of extension cords can truly speed up progress and make even large-scale renovations manageable for any DIYer.
- Length, gauge, and safety ratings

6. Tool Kit & Basic Tool Kit: Set Yourself Up for DIY Success
While piecing together a tool collection over time makes sense for some, beginners benefit from a high-quality tool kit or basic tool kit. These pre-assembled kits gather the most-used essential tools—hammers, tape measures, pliers, screwdrivers—into one organized, portable case. Kits vary widely, so think about your improvement project needs: are you fixing small things or diving into a full home renovation? Custom kits let advanced DIYers select upgrade brands or specialty tools to fit their specific ambitions, while starting with a reputable pre-made kit ensures no critical tool is missing at crunch time. As your skill grows, supplement your toolkit with power tools, specialty driver sets, and precision gadgets for a truly tailor-made collection.
Comparing Pre-Made vs Custom Basic Tool Kits
Pre-made tool kits are ideal for busy homeowners who want dependable essentials and easy storage. Premium kits may include lifetime warranties, reinforced cases, and corrosion-resistant tools. On the other hand, custom kits let you pick only top-rated gear, ensuring each tool perfectly matches your preference and the scale of future diy projects. No matter your approach, the most important aspects are coverage (screwdrivers, hammer, tape measure, pliers) and upgradability, so your tools evolve along with your skills. Your tool kit should grow as your ambitions do—making sure you’re always ready for your next home improvement adventure.
7. Claw Hammer & Wrecking Bar: Demolition and Construction Essentials
A trusty claw hammer and sturdy wrecking bar are the muscle of the diy home improvement tools world. The hammer drives nails, pulls them out, and can help with light demolition, while the wrecking bar is built for prying, demolition, and heavy-duty renovations. Quality hammers come with anti-vibration handles and forged steel heads for balance and endurance. For demolition phases, the wrecking bar lifts, splits, and removes stubborn materials—from old framing to trim or worn tile during a home renovation. Both are fundamental tools that bear the brunt of physical work, so choose for strength and comfort above all else.
Multipurpose Use in DIY Projects and Home Renovation
Look for claw hammers with curved claws for easy nail removal and check that your wrecking bar features flat, angled ends for maximum leverage. Together, they’ll save your back and minimize material damage during even the toughest projects. Whether you’re building, remodeling, or making repairs, these manual tools prove invaluable. Store them in an easy-to-reach part of your tool kit and keep the hammerhead free of rust for long service life. With these at your side, demolition is less effort and more satisfaction, powering you through any improvement project you dream up.

8. Power Tools: Taking Your Home Improvement Project to the Next Level
Want to dramatically upgrade your home improvement project? Investing in power tools like saws (circular, jigsaw, reciprocating), sanders, and compact routers is the ticket to professional results. These tools boost speed, precision, and creativity—allowing you to frame walls, cut flooring, and finish surfaces with ease. Choose corded models for continuous power on big jobs, or cordless for flexibility in tight spaces. Matching the power and style of your saw or sander to your typical diy projects is key: a weekend crafter may not need a massive table saw, but a good jigsaw and a palm sander can tackle 90% of renovation tasks.
Must-Have Power Tools: Saws, Sanders, and More
Include safety gear like safety glasses and hearing protection for every power tool session. Read manuals for maintenance tips and safe operation—clean blades, change sandpaper, and lubricate moving parts regularly. As your skills and ambition grow, specialty power tools (like cordless impact drivers or finish nailers) help you level up your home improvements. By slowly expanding your collection, you’ll always be ready for any complex DIY project that comes your way.
9. Safety Glasses: Protecting Yourself with Essential Tools
No improvement project is worth risking your vision. Safety glasses are essential for cutting, grinding, sanding, and working with power tools. Shatter-resistant, wraparound lenses protect you from flying debris, dust, and chemical splashes. No matter your skill level, always wear proper eye protection throughout your home renovation. In fact, many experienced pros refuse to start a job until everyone on site is safely equipped. Having a few pairs in your tool kit ensures you’ll never have a good excuse to skip this crucial precaution.
Why Safety Matters in Every DIY Home Improvement Project
Sharing tools with family or neighbors? Make sure each person has suitable safety glasses that fit well, don’t fog, and offer side coverage. Periodically inspect glasses for cracks or loose arms, replacing as needed. With proper safety habits, you’ll work confidently, focus on the task, and protect one of your most vital senses every time you tackle an improvement project.
10. Bonus: Smart Tools for Modern DIY Projects
The latest wave of diy home improvement tools features high-tech devices like laser distance measurers, digital stud finders, and multi-tools. A laser level allows fast, perfectly aligned layouts for shelves, cabinets, or picture walls, while an electronic stud finder finds joists and avoids wires behind drywall. These smart tools save you guessing, minimize error, and add a professional edge to even the most casual home project. As more digital solutions become available, consider adding one or two to your tool collection for next-level efficiency and accuracy.
Laser Distance Measurers, Stud Finders, and More
If you like to document your projects or share them in a blog post, these smart tools often feature Bluetooth connectivity for quick project logging and data transfer. Investing in the next generation of gadgets keeps your home improvements on the cutting edge—literally and figuratively—making every project easier, smarter, and more enjoyable for years to come.
Lists: Checklist for Your Next Home Renovation
- Essential tool inventory list to check before starting any home improvement project.
- Tape measure
- Power drill and assorted drill bits
- Screwdriver set (flathead & Phillips)
- Utility knife with spare blades
- Claw hammer and wrecking bar
- Extension cords (various lengths/gauges)
- Basic tool kit & specialty driver set
- Safety glasses and gloves
- Smart tools (laser level, stud finder, voltage tester)
Quotes: Expert Advice on DIY Home Improvement Tools
"Invest in quality diy home improvement tools—it’s the foundation of every successful home renovation project." - Professional Contractor
Practical Tips for Assembling Your DIY Project Tool Arsenal
- Buy a tool kit designed for home improvement.
- Upgrade your screwdriver set and basic tool kit as projects get more complex.
- Store your diy home improvement tools properly and maintain sharpness/safety.
People Also Ask: Must-Have DIY Home Improvement Tools
What are must-have DIY tools?
Answer: Must-have diy home improvement tools include a tape measure, power drill, screwdriver set, utility knife, extension cord, tool kit, claw hammer, and safety glasses for every home renovation or improvement project.
What tools do I need as a new homeowner?
Answer: As a new homeowner, essential tools should cover a basic tool kit—screwdrivers, hammer, tape measure, utility knife—and power tools for regular home improvement projects.
What is the most versatile DIY tool?
Answer: The power drill is the most versatile DIY home improvement tool, suitable for drilling, driving, and even mixing paints or mortars with the right attachments.
What are good starter tools?
Answer: A screwdriver set, tape measure, utility knife, and claw hammer are good starter diy home improvement tools for anyone beginning their improvement project journey.
FAQs: DIY Home Improvement Tools for Every Project
- How do I maintain my power tools? Regularly clean tools after use, lubricate moving parts, replace worn parts, and store in a dry place to prevent rust.
- Are expensive essential tools worth it for DIY projects? Investing in high-quality essential tools saves time, improves results, and often lasts much longer, making them worthwhile for frequent renovations.
- What should I look for in a basic tool kit for home renovation? A solid kit should include pliers, adjustable wrench, screwdriver set, tape measure, utility knife, hammer, and room for expansion as projects become advanced.
Key Takeaways: Choosing the Best DIY Home Improvement Tools
- The right diy home improvement tools transform complex tasks into manageable projects.
- Investing in an essential tool set saves time and money for every improvement project.
- Regular updates to your tool kit keep your diy projects on track and safe.
Conclusion: Upgrade Your DIY Journey with the Right Home Improvement Tools
Final Thoughts on Building Your DIY Tool Arsenal for Every Home Renovation
With the right diy home improvement tools, every improvement project becomes more efficient, safer, and a lot more enjoyable. Start with the essentials, grow your tool kit, and let your home projects shine.
Watch our recommended guide: How to Choose the Best DIY Home Improvement Tools for Beginners


Write A Comment